Slowpaddle Guide to Wings & The People’s Choice Champion Wingsauce Secret Recipe
Intro: The Spirit of Buffalo Wings
Buffalo wings aren’t just a recipe — they’re a season. As summer vacations at the beach or lake wind down and the weather cools, something shifts. Football returns, baseball enters the playoffs, and hockey kicks off its preseason. Tailgates fire up, grills get dragged out of garages, and every weekend becomes an excuse to gather, eat, and compete. Wing season is fall’s unofficial holiday — a mix of friendly rivalry, smoky air, loud crowds, and the unmistakable smell of hot sauce.
At the heart of wing season are the community events that bring people together. One of the best examples is Big L’s Annual Chicken Wing Cook Off, a local tradition that does more than crown a wing champion — it raises money for The Vista School, supporting autistic kids and their families. It’s the kind of event that reminds you why wings lives matter: they’re about generosity, connection, and showing up for something bigger than yourself.
What makes Buffalo wings special isn’t just the heat or the crunch — it’s the culture around them. They show up at cookoffs, game‑day spreads, backyard parties, and late‑night hangouts. They’re communal food, meant to be shared, debated, and perfected. And whether you’re cooking for a crowd or just trying to level up your own wing game, great wings come down to simple techniques, a little patience, and an appreciation for where this tradition started.
Before we get into the how‑to, it’s worth taking a quick look at where Buffalo wings came from — and how they became the flavor of fall.
A Quick History of Buffalo Wings
Buffalo wings may feel like they’ve been around forever, but they’re actually a relatively recent addition to American food culture. The story begins in 1964 at the Anchor Bar in Buffalo, New York, where co‑owner Teressa Bellissimo is credited with creating the first batch. As the legend goes, her son and his friends showed up late one night looking for something to eat. Teressa grabbed a bag of unused chicken wings — at the time considered scrap or soup stock — fried them up, tossed them in a mixture of hot sauce and butter, and served them with celery and blue cheese. A classic was born.
Today, you can still visit the Anchor Bar and order wings made the same way they were in the 60s — or even buy their original Buffalo wing sauce online if you want to recreate the flavor at home.
From that humble beginning, wings spread quickly through Buffalo’s bar scene, becoming a staple of late‑night menus and local gatherings. By the 1980s and 90s, wings had exploded nationwide thanks to the rise of sports bars and the growing culture of game‑day food. Chains like Hooters and Buffalo Wild Wings helped push wings into the mainstream, each adding their own spin, sauces, and traditions. Wings were cheap, easy to share, and perfect for crowds — everything American sports culture thrives on.
As wings gained popularity, regional styles emerged: extra‑hot Buffalo, sweet‑heat variations, smoked wings, grilled wings, dry rubs, and countless sauce combinations. Cookoffs and competitions followed, turning wings from bar food into a full‑blown culinary sport. Today, Buffalo wings are woven into fall traditions — tailgates, playoff parties, backyard gatherings, community events and fundraising competitions where flavor meets purpose and friendly rivalry supports a great cause.
Sauces Worth Having on Hand
Later in the guide we’ll deep-dive into making your own sauces, but if you’re in a rush or just want to taste some classic representations of the Buffalo Wing Sauce style, here are the staples worth grabbing:
- Anchor Bar Original Buffalo Wing Sauce — the OG.
- Frank’s RedHot Buffalo Wing Sauce — classic, reliable, everywhere.
- Buffalo Wild Wings sauces — great for variety and crowd‑pleasing flavors.
- Hooters Wing Sauce — nostalgic, buttery, perfect for fried wings.
- Capital City Mambo Sauce — History Channel claims Mambo Sauce was in Buffalo first
I think it’s really helpful to use these as a fairly reliable baseline to compare your sauce too. How sweet is your’s compared to theirs? How vinegar or tangy? These are all available online, click the hyperlinks to Amazon.
Understanding where wings came from helps explain why they’ve become such a beloved part of wing season. They started as a simple late‑night snack and grew into a cultural icon — one that brings people together every fall to celebrate heat, flavor, and community.
Choosing Your Wing Style: Smoked & Grilled, Fried, or Baked
Before you dive into sauce and seasoning, it helps to decide what kind of wings you want to make. Every style brings its own personality to wing season — the deep, wood‑fired flavor of smoked and grilled wings, complete with a bit of char from the flame kissing the sauce; the nostalgic crunch of classic fried wings; and the lighter but still crispy baked wings that are perfect for big batches. There’s no wrong choice here. Each method delivers something unique, and the real key is choosing the style that fits your setup, your crowd, and the kind of wing experience you want to create.
Smoked & Grilled Wings
The key to smoked and grilled wings is managing temperatures. You start low‑and‑slow to build rich smoke flavor and let the fat render so the meat stays juicy, then finish by cranking up the heat to get that crispy skin and a bit of char. It’s a two‑stage process (lower temp smoking & higher temp grilling) that rewards patience — and it delivers wings with depth you simply can’t get any other way.
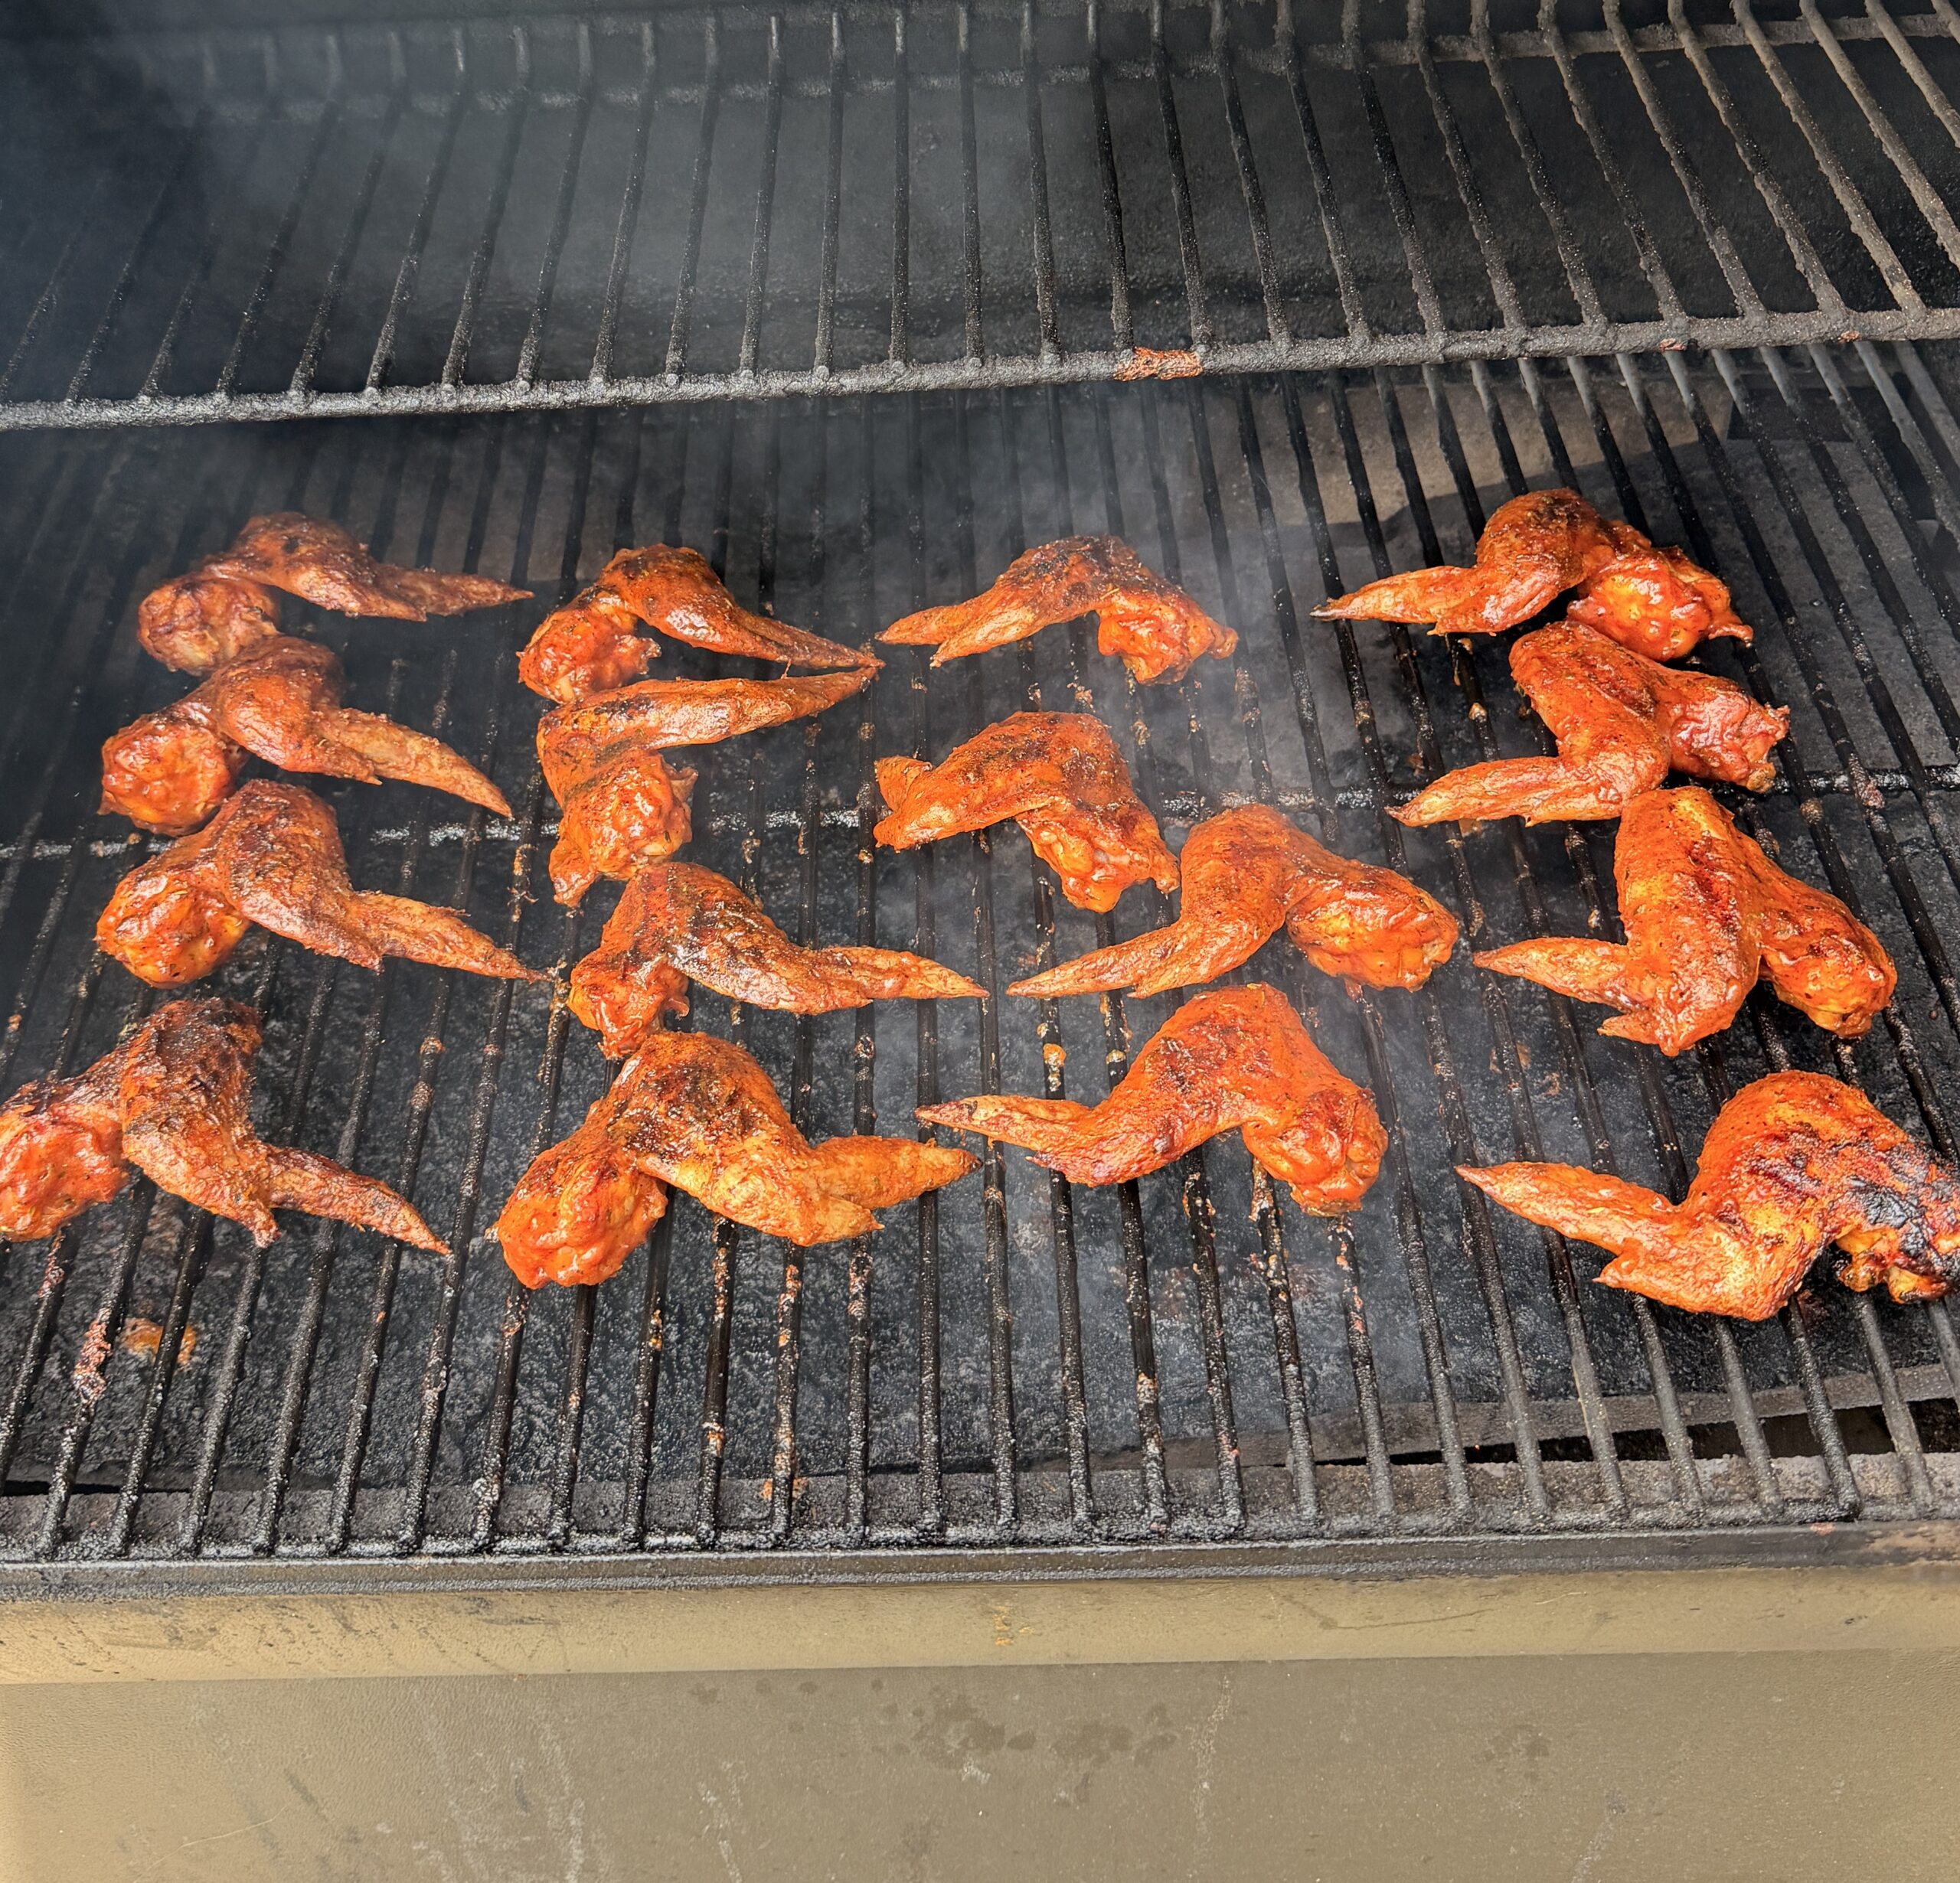
I like to combine pecan, hickory, and cherry wood for the perfect blend of smoke. Pecan brings a distinctive nuttiness, hickory is classic and strong, and cherry adds a subtle red color and a touch of fruitiness. OMG, can you smell that! The top side of the wing has a little bit thicker skin, so we want to start with the top facing down. After about an hour at 250°F, crank up the heat to finish the wings and flip to get that golden‑brown skin on both sides. Then sauce them up and place them back them on the grill for just a few minutes to let the glaze tighten, caramelize, and pick up just a kiss of char.
This is my absolute favorite way to make wings when I have the time. Smoked and grilled wings feel like an experience — the kind you make for tailgates, backyard parties, or any night when you want wings that taste like fall itself.
Classic Fried Wings
Classic fried wings are the OG— the original Buffalo wing method that started it all at the Anchor Bar. When people talk about “authentic” Buffalo wings, this is what they mean: wings fried hot and fast until the skin turns crisp, the meat stays juicy, and the whole thing is ready to soak up that buttery hot‑sauce glaze.
The magic of fried wings comes from simplicity and precision. You’re not building smoke flavor or managing a long cook; you’re controlling oil temperature. Keep your oil around 350°F, and the wings will fry evenly, rendering the fat under the skin and creating that signature shattering crunch. Too hot and they burn before cooking through; too cool and they get greasy. When the temperature is right, fried wings come out golden, crisp, and ready for sauce.
Frying also gives you speed. A batch of wings can be done in 10–12 minutes, making this method perfect for game‑day spreads, tailgates, or any time you need to feed a crowd fast. Once they come out of the oil, let them rest briefly on a rack — not paper towels — so the crust stays crisp. Then toss them immediately in warm Buffalo sauce so the glaze clings to every crack and crevice.
There’s a reason fried wings became the standard: they deliver pure Buffalo wing nostalgia. No smoke, no grill marks, no oven tricks — just crisp skin, juicy meat, serious crunch and that unmistakable Buffalo flavor. When you want wings that taste like the original, this is the way.
Crispy Baked Wings
Crispy baked wings are the unsung hero of wing season — especially for people cooking in the city, in apartments, or anywhere outdoor space is limited. Not everyone has a smoker or grill, and not everyone wants their place smelling like fryer oil for a week. Baked wings solve all of that. They give you crunch, they give you color, and they give you Buffalo‑worthy texture without needing a backyard or a deep fryer.
Tip: Baked wings don’t have the luxury of long cook times or bubbling oil to dry out the skin. Blot the wings with a paper towel before placing them on the rack — removing that surface moisture helps them crisp up as much as possible.
The secret is treating baked wings like their own technique, not a compromise. High heat does the heavy lifting, rendering the fat under the skin and crisping the outside without drying out the meat. A wire rack helps air circulate so the wings cook evenly, and a quick broil at the end adds that final snap. If you’ve got an oven with a circulating fan — or an air fryer — you’re already ahead of the game. Both mimic the airflow of a commercial kitchen, giving you even more crisp with less effort.
And here’s the fun part: baked wings come with cheat codes. Later in this guide, we’ll cover how to smoke wings in the oven without setting off the fire alarm. Done right, baked wings come out golden, blistered, and ready to take on sauce just like their fried cousins.
This method is perfect for big batches — game‑day trays, apartment parties, or weeknight cravings where you want wings without the hassle. They’re clean, reliable, and surprisingly close to the classic fried texture. And for anyone who loves wings but doesn’t love lingering grease smell, baked wings are the move.
Prep Basics: What You Need Before You Start
Great wings don’t start at the grill, fryer, or oven — they start with the prep. Before you season anything or fire up any heat source, a little groundwork makes all the difference. Wing prep is where you choose your sauces, gather your tools, and set yourself up for crisp skin, juicy meat, and consistent results no matter which cooking style you use. Small decisions here quietly shape the final product: how dry your wings are, what rack you use, how you line your pans, and even which sauces you keep on hand. This section covers everything you need before the cooking begins, from essential equipment to store‑bought sauces worth having in your pantry, plus a few pro tips that make wing day smoother, cleaner, and way more fun.
Choosing Your Wings
Wings come in two basic formats: whole wings and separated sections (often sold as “party wings”). Both work — but each shines in different cooking styles.
Whole Wings (Best for Smoking & Grilling)
For smoked and grilled wings, whole wings are the move. They’re easier to flip, easier to sauce, and they hold together better when you’re working over open heat. Whole wings also present beautifully on a platter — especially when you arrange them neatly with the tips aligned.
Whole wings give you all three sections:
Drumette — meaty, rich, cooks fastest, easiest to eat with one hand.
Flat — tender, even cooking, great sauce coverage, takes a little more skill to devour.
Tip — mostly skin and bone, but you can get a little taste of pure crispy skin and sauce from the bottom edge.
A fun detail most people never think about: wings come as left wings and right wings. We’re not getting political here, and it doesn’t change the flavor, but it does matter for placement on certain grills. On pellet grills, for example, a plate or pan covers the fire chamber. At high heat, the flames rise up along the outside edges, which means the thin wing tips can burn if they’re too close to that open flame.
To avoid that, place the meatier drum side facing the hotter outer edge and the thin tip pointing inward toward the cooler center. Practically, that means:
Right wings go on the left side of the grill, tips pointing in.
Left wings go on the right side, tips pointing in.
Also, place your larger wings near the hotter outer edge and your smaller wings toward the middle for a more even cook. If you’re cooking on a circular charcoal grill, the middle is probably the hotter zone–keep those drum-sides in and the wing tips out.
And when it’s time to serve? We eat first with our eyes (though smell might want a word). Arrange your right wings on one side of the platter and your left wings on the other. It creates a cleaner, more organized presentation and makes better use of the space.
Separated Party Wings (Best for Frying)
For frying, party wings (pre‑cut flats and drums) are ideal. They cook evenly, fit better in the fryer, and give you that classic Buffalo wing experience. If you’re breaking down whole wings yourself, I don’t recommend it, but here’s the technique:
Find the joint between the drumette and flat — bend the wing and it reveals itself.
Use kitchen shears or a sharp chef’s knife to cut through the soft cartilage.
Repeat at the joint between the flat and the tip.
Save the tips for stock or discard them — they’re not great for frying.
Baked Wings (Whole or Separated — Your Call)
For baked wings, you can go either way. Whole wings have a slight advantage because they retain moisture, crisp nicely, and require less flipping, but it’s nowhere near as important as it is on a grill or smoker. Party wings give you more of the traditional Buffalo wing experience — drums and flats, easy portioning, and a familiar look on the tray. If you’re cooking for a crowd, party wings make serving simpler; if you’re cooking for yourself, whole wings are less work and just as effective.
Drying: The First Step to Crisp Skin and Juicy Meat
Ever have wings that were slimy or rubbery? If you want wings with crisp skin and juicy meat, drying is important–for baked wings drying is imperative. Moisture is the enemy of crisp. Every cooking method — smoked, grilled, fried, baked, or air‑fried — gets better when the skin starts dry. Dry skin browns faster, crisps more evenly, and helps the fat underneath render instead of steam.
Drying isn’t complicated, but it’s one of those small steps that quietly separates great wings from average ones.
Why Drying Matters
- Crisp skin: Wet skin steams before it browns. Dry skin browns immediately.
- Juicy meat: When the skin crisps quickly, the meat underneath cooks more gently and stays moist.
- Better grill marks: Dry skin chars more predictably.
- Cleaner frying: Less moisture = less splatter and more even frying.
- Superior baked wings: Dry skin is the only way to get oven wings truly crispy without gimmicks.
How to Dry Wings Properly
- Pat them dry thoroughly Use paper towels to remove surface moisture. Don’t be shy — blot the flats, drums, and especially the underside where moisture hides.
- Place wings on a wire rack Airflow is everything. A rack lets air circulate around the wings instead of trapping moisture against the pan.
- Refrigerate uncovered (optional but powerful) If you have time, let the wings sit in the fridge for 1–12 hours. The cold, dry air pulls moisture from the skin, giving you a restaurant‑level crisp.
Style‑Specific Drying Notes
- Smoked & Grilled Wings: Dry skin will reduce the amount of cooking time and give stronger grill marks for clear sauces or dry rubs. If your using a two-stage method (low heat then finish on high heat) pre-drying the wings is less important, but still impactful. If you’re going straight high-heat, you need to pat your wings dry.
- Fried Wings: Dry wings fry cleaner, crisp faster, and absorb less oil. This is the difference between crunchy wings and soggy ones.
- Baked Wings: Drying is critical here. Oven wings don’t have bubbling oil or long cook times to remove moisture, so the skin must start dry to crisp properly.
Extra Tips for Maximum Crisp
- Don’t crowd the rack. Wings need space for air to circulate.
- Flip halfway through drying if you’re doing a long fridge rest.
- Avoid marinades before cooking. They add moisture — sauce comes later.
- Use a fan‑assisted oven or air fryer for even better results; dry skin + airflow = crisp magic.
Essential Tools
You don’t need a restaurant kitchen to make great wings, but a few tools make life easier:
- Wire rack + sheet pan — essential for baking and resting fried wings
- Tongs — never stab wings with a fork
- Instant‑read thermometer — for frying and grilling
- Large mixing bowl — for tossing wings in sauce
- Foil or parchment — keeps cleanup sane
- Kitchen shears — for trimming whole wings
- Charcoal Grill — for old school grilling
- Pit Barrel — what we use when remote
- Pellet Grill — what we use at home
- Air fryer (optional) — a cheat code for apartment cooking
- Convection oven (optional) — circulating fans = crispier skin
If you’re smoking or grilling:
- Charcoal or wood chunks — Pecan/Hickory/Cherry is dynamite!!!
- Heat‑resistant gloves
- Chimney starter
- Spray bottle (water or apple juice)
Seasoning Basics
You don’t need much, if any, before cooking — wings are naturally flavorful. A simple base seasoning works great for every style:
- Kosher salt — go easy, there is plenty of salt in most store-bought hot sauces and rubs.
- Black pepper
- Garlic powder
- Paprika (great for color)
Keep it light, or even skip seasoning completely. I generally use my base BBQ rub (with no salt) because I keep a batch on hand at all times, so its convenient. If you’re smoking wings, go even lighter — smoke adds plenty of flavor. But remember: the sauce is the star!
Can You Cook Wings From Frozen? (And Why Thawing Is Better)
Short answer: yes, you can cook wings from frozen — but thawing is almost always better. Frozen wings are safe to cook straight from the freezer, and in a pinch they’ll get the job done. But if you want crisp skin and juicy meat, thawing gives you a major advantage.
Cooking Wings From Frozen
If you’re starting with frozen wings, here’s what to expect:
- They release a lot of moisture. As they thaw in the heat, water escapes from the skin and the joints. This makes crisping harder, especially in the oven.
- They take longer to cook. Frozen wings need extra time to reach a safe internal temperature, which can dry out the meat if you’re not careful.
- They don’t brown as evenly. The exterior stays wet longer, so the skin doesn’t crisp until late in the cook.
Still, if you’re in a rush:
- Oven: Cook at high heat (425–450°F) and expect an extra 10–15 minutes.
- Air fryer: Works surprisingly well — the airflow helps evaporate moisture.
- Grill: Possible, but flare‑ups are more likely due to melting ice and dripping water.
- Frying: You can fry frozen wings, but they will splatter aggressively — and not in a cute “sizzle in the pan” way. Think about those Thanksgiving fried‑turkey disaster videos where someone drops a frozen bird into a pot of 350°F oil and the whole thing erupts like a volcano. Same physics, smaller scale.
- If you’re going to fry wings straight from frozen:
- Use a deep, heavy pot
- Keep the oil level low
- Lower the wings slowly keeping a steady temperature
- Watch for over-flows
- Only do this if you’re experienced and comfortable managing hot oil. For everyone else, thawing is the safer, cleaner, and far more predictable option.
Frozen wings are fine in emergencies — but they’re never ideal.
Why Thawing Is Better
Thawing gives you control. And control is everything when you want wings with crisp skin and juicy meat.
Here’s why thawed wings outperform frozen every time:
1. Better Browning and Crisping
Dry skin browns immediately. Wet skin steams first. Thawed wings can be dried properly, which means:
- Better grill marks
- Better frying crisp
- Better oven blistering
2. More Even Cooking
Frozen wings cook unevenly — the outside warms while the inside is still icy. Thawed wings cook predictably, so you get:
- Juicier meat
- Fewer overcooked drums
- No undercooked flats
3. Cleaner Frying
Moisture + hot oil = chaos. Thawed wings fry cleaner, safer, and crisp faster.
4. Better Seasoning
Salt and spices stick to thawed wings. Frozen wings shed seasoning as they thaw.
Storage & Thawing Tips
If You’re Buying Frozen Wings
- Thaw in the fridge for 24 hours Slow thawing keeps the texture intact.
- Never thaw on the counter Unsafe and causes uneven thawing.
- Pat dry thoroughly after thawing Frozen wings hold extra moisture — blot aggressively.
- Don’t refreeze thawed wings Refreezing breaks down the skin and makes it rubbery.
If You’re Prepping Ahead
- Season and refrigerate for up to 24 hours This dries the skin even more and improves crisp.
- Don’t sauce wings until after cooking Sauce is always the final step — early saucing ruins crisp.
Making Classic Buffalo Sauce: Hot Sauce + Butter
At the heart of Buffalo wings is the simplest, most perfect formula in wing history: hot sauce + butter. That’s it. Two ingredients that melt together into a glossy, tangy, spicy, buttery glaze that clings to every crack and crevice of a wing. This section breaks down the classic recipe, the types of butter you can use, the best hot sauces for the job, and how to customize heat and flavor with add‑ins.
The Basic Buffalo Sauce Recipe
This is the foundation — the sauce that started at the Anchor Bar and became the blueprint for wing culture. The base formula is simple: ½ cup hot sauce and 4 tablespoons of butter. Warm them gently until the butter melts and the sauce emulsifies into a smooth, cohesive glaze. Toss your wings immediately while the sauce is warm; warm sauce grips crisp skin, while cold sauce slides off and dulls the texture. This ratio gives you a classic medium‑heat Buffalo flavor, and from here you can adjust everything.
Butter: The Backbone of Buffalo Sauce
Butter isn’t just richness — it’s the emulsifier that turns thin hot sauce into a silky glaze. The type of butter you choose changes the flavor and texture more than people realize. Salted butter is the most common choice, adding seasoning and rounding out the heat for a traditional Buffalo profile. Unsalted butter gives you more control, especially if you’re using a saltier hot sauce like Crystal.
European‑style butter, with its higher fat content, creates a richer, creamier sauce with a slightly thicker glaze — perfect if you want an “extra buttery” Buffalo wing. Clarified butter or ghee has a higher smoke point and a cleaner flavor, making it ideal for grilled or smoked wings where you might finish the sauce over heat. And if you want a sauce that clings even more tightly, a small splash of neutral oil (like avocado or canola) added to your melted butter can help, especially for baked wings where crisp skin benefits from a thinner glaze.
Hot Sauce vs. Wing Sauce: What’s the Difference?
Most people use these terms interchangeably, but they’re not the same. Hot sauce is the ingredient you build Buffalo sauce from — thin, vinegar‑forward, pure pepper flavor, designed for general use on everything from eggs to tacos. Frank’s RedHot, Crystal, Texas Pete, Cholula, and Louisiana Hot Sauce are all great examples.
Wing sauce, on the other hand, is the finished product — hot sauce blended with butter or oil and seasonings. It’s thicker, smoother, and ready to use straight from the bottle. Frank’s RedHot Wing Sauce, Anchor Bar Wing Sauce, Buffalo Wild Wings sauces, and Hooters Wing Sauce are all popular options. You don’t need to add butter to wing sauce unless you want to tweak it.
Popular Hot Sauces for Buffalo Wings
Frank’s RedHot Original is the OG — mild heat, tangy, perfectly balanced, and the safest traditional choice. Crystal is brighter and more vinegar‑forward, with a slightly saltier profile that makes for a sharper Buffalo sauce. Texas Pete is mild, smooth, and crowd‑pleasing, great for big batches. Cholula brings a more complex, slightly smoky flavor — not traditional, but excellent for a gourmet twist. TABASCO Pepper Sauce is thinner and classic Southern, ideal for a lighter Buffalo sauce.
Add‑Ins: How to Customize Your Buffalo Sauce
Once you’ve mastered the base recipe, you can tweak it endlessly. For more heat, cayenne pepper is the classic Buffalo booster, while crushed red pepper flakes add both bite and texture. A teaspoon or two of hotter sauces — Tabasco, habanero blends, or chili oil — can raise the temperature without changing the flavor too much.
For deeper flavor, garlic powder is the number‑one add‑in, followed closely by onion powder. Worcestershire sauce adds umami and depth. Honey or brown sugar brings sweet heat and helps the sauce caramelize beautifully on the grill. Smoked paprika adds warmth and color, lemon juice brightens everything, and black pepper sharpens the finish.
If you want a thicker or creamier sauce, simply add more butter. A splash of oil helps the sauce cling more tightly, and a tiny cornstarch slurry (rare, but effective) can thicken the sauce without altering the flavor.
Heat Levels: How to Control Spice
You control heat with two levers: the hot sauce you choose and the amount of butter you use. Mild sauces like Frank’s or Texas Pete create a gentle Buffalo heat. Crystal and Louisiana sit in the medium range. Tabasco and habanero sauces push things into the hot category, and scorpion or ghost pepper sauces take you into nuclear territory.
Butter is your second lever. More butter means a milder sauce; less butter means a hotter one. For example, ½ cup hot sauce with 6 tablespoons of butter gives you a mild Buffalo. Four tablespoons is classic medium. Two tablespoons is hot. One tablespoon plus extra hot sauce add‑ins is full‑blown nuclear.
Wrapping Up the classic Buffalo Sauce
Now that you’ve got the foundation down, it’s time to put these sauces to work. The real magic of Buffalo wings happens when technique meets flavor — smoking, grilling, frying, baking — each method brings out something different. So before we get to the award‑winning Buffalo Garlic Ranch sauce later in the guide, let’s walk through the cooking methods that make every wing style shine.
Cooking Method Walkthroughs
Smoked & Grilled Wings: The Fire‑Kissed Method
Smoked and grilled wings are the soul of outdoor wing cooking — rustic, bold, and full of personality. This method gives you deep flavor, crispy skin, and that unmistakable kiss of flame you can’t get anywhere else. The key is managing heat, placement, and timing, then finishing with sauce in a way that complements the char instead of fighting it.
Step 1: Prep the Wings (Whole Wings Recommended)
Whole wings shine on the grill. They’re easier to flip, easier to sauce, and they hold together better over open heat. You already covered left wings vs. right wings in Section 4. Pat the wings dry thoroughly. Light seasoning only — salt, pepper, maybe a touch of garlic powder. Smoke and fire will do the heavy lifting.
Step 2: Set Up Your Grill or Smoker
You can smoke wings low‑and‑slow or grill them hot‑and‑fast. The best results come from a hybrid approach:
- Start low to build smoke flavor and render fat.
- Finish hot to crisp the skin and add char.
For Pellet Grills
- Set to 250°F for the smoke phase.
- Use a blend of pecan, hickory, and cherry for balanced flavor.
- Expect 45–60 minutes at this stage.
For Charcoal Grills
- Bank coals to one side.
- Keep wings on the cool side for the smoke phase.
- Add wood chunks for flavor– Use a blend of pecan, hickory, and cherry for balanced flavor.
For Gas Grills
- Use a smoker box or foil pouch of wood chips.
- Keep one burner low and one burner off to create indirect heat.
Step 3: The Smoke Phase (250°F for ~1 Hour)
This is where wings develop their deep flavor.
- Place wings on the grill according to left/right orientation.
- Keep the lid closed — smoke needs time to work.
- Render the fat slowly; the skin will tighten and start to dry.
- Flip once about 40 minutes through to keep the cook even.
You’re not looking for crisp yet — you’re building flavor and structure.
Step 4: The Crisp Phase (375–425°F)
After about an hour, crank the heat. Our goal now is to get a nice, even golden‑brown color on all sides. One side of the wing has thicker skin — the outer side — and that thicker skin takes longer to brown. I prefer to start by crisping that side first. When it’s ready, the thinner‑skin inner side will only need a few minutes to finish. This approach gives you better control, prevents over‑browning, and ensures the wings develop that perfect grilled texture before you move into the saucing stage.
WATCH: The skin may blister and release grease into the fire, and when that happens you’ll get flare‑ups. That’s normal — it’s part of grilling wings — but you need to stay alert so you’re not burning your wings. Keep an eye on the color, move wings away from direct flame when the fire kicks up, and use your tongs to shift them around the grill as needed. Controlled flame kisses add flavor; uncontrolled flames ruin skin fast.
On pellet grills, this means:
- Raising the temp to 400–450°F
- Being mindful of flame pockets along the edges
- Keeping wing tips pointed inward
- Crisp the thicker skin side first to a golden brown, then flip
On charcoal or gas grills:
- Move wings over direct heat
- Flip every 2–3 minutes
- Watch for flare‑ups — fat rendering will cause fire kisses
This phase gives you:
- Golden brown skin
- Light blistering
- A bit of char
- That perfect grilled wing texture
Cook until wings hit 185–190°F internal — higher than chicken breast, but perfect for wings.
Step 5: Saucing Smoked & Grilled Wings
Saucing grilled wings is different from saucing fried wings. You’re working with char, smoke, and crisp skin — and you want the sauce to complement that, not drown it.
The Two‑Stage Saucing Method (Best for Grilled Wings)
Stage 1: Light Toss or Brush Once we achieve that golden brown on both sides, toss them lightly in warm sauce or apply with a saucing brush. This coats the skin and lets the sauce seep into the charred edges.
Stage 2: Caramelize on the Grill Place the wings back on the grill for 30–60 seconds per side. This does three things:
- Sets the sauce
- Caramelizes the sugars
- Adds a sticky, smoky finish
*If brushing the sauce on, paint the wings with sauce, flip, paint the other side with sauce, flip, and wait 30-60 seconds then remove.
Stage 3: Final Toss (Optional) If you want a saucier wing, give them a second toss right before serving.
This double‑sauce method is how you get wings that look and taste like they came from a competition tent or a tailgate pro.
Step 6: Serving Smoked & Grilled Wings
Presentation matters — especially with whole wings.
- Arrange right wings on the left side of the platter.
- Arrange left wings on the right side.
- Align the tips for a clean, professional look.
- Serve with celery, carrots, and ranch or blue cheese.
Smoked and grilled wings are meant to be rustic, bold, and memorable — the kind of wings people gather around.
Classic Fried Wings: The Anchor Bar Method
Fried wings are the OG — the original Buffalo wing style that started it all at the Anchor Bar. When people talk about “authentic” Buffalo wings, this is what they mean: wings fried hot and fast until the skin turns crisp, the meat stays juicy, and the whole thing is ready to soak up warm Buffalo sauce. Fried wings deliver pure nostalgia — no smoke, no grill marks, no oven tricks — just crisp skin, juicy meat, and that unmistakable Buffalo flavor.
Below is the full fried‑wing method, including saucing, timing, and the little details that make the difference between good wings and great ones.
Step 1: Prep the Wings (Party Wings Recommended)
For frying, separated wings — flats and drums — are the way to go. They cook evenly, fit better in the pot, and give you the classic Buffalo wing experience.
If you’re breaking down whole wings yourself:
- Bend the wing to expose the joint.
- Cut through the soft cartilage between drum and flat.
- Repeat at the joint between flat and tip.
- Save tips for stock or discard.
Pat the wings dry thoroughly. Remember: moisture is the enemy of crisp and the cause of splatter.
Season lightly with salt and pepper. Fried wings don’t need heavy seasoning — the sauce does the work.
Step 2: Heat the Oil
Use a deep, heavy pot or Dutch oven. Fill it no more than halfway with oil — peanut, canola, or vegetable oil all work well.
Your target temperature is 350°F. This is the sweet spot:
- Hot enough to crisp the skin
- Cool enough to cook the meat through
- Stable enough to avoid burning
Let the oil come fully to temperature before adding wings. Rushing this step leads to greasy wings.
Step 3: Frying the Wings (10–12 Minutes)
Add wings in small batches. Overcrowding drops the oil temperature and ruins crispness.
As they fry:
- The skin will tighten and turn golden
- Fat will render from under the skin
- The wings will float when they’re close to done
Fry until the wings reach 185–190°F internal — higher than chicken breast, but perfect for wings. This temperature ensures tender meat and fully rendered skin.
A Note on Frying Frozen Wings
You can fry frozen wings, but they will splatter aggressively — think mini versions of those Thanksgiving fried‑turkey disaster videos. Only do this if you’re experienced and using a deep pot. For everyone else, thawing is safer, cleaner, and produces better wings.
Step 4: Resting the Wings
When wings come out of the oil, don’t put them on paper towels — that traps steam and softens the skin.
Instead:
- Place wings on a wire rack
- Let excess oil drip away
- Allow the crust to set for 1–2 minutes
This short rest keeps the skin crisp and prepares it for saucing.
Step 5: Saucing Fried Wings (Warm Sauce Only)
Saucing fried wings is simple but precise. The sauce must be warm, never cold. Cold sauce kills crisp skin instantly.
Here’s the classic Buffalo saucing method:
- Warm your sauce (hot sauce + butter) until smooth.
- Place wings in a large bowl.
- Pour sauce over the wings.
- Toss gently but thoroughly.
Fried wings absorb sauce beautifully because the skin is porous and crisp. You don’t need a double‑sauce method here — one good toss is perfect.
If you want extra sauce, add a second drizzle after plating.
Step 6: Serving Fried Wings
Fried wings are all about simplicity and nostalgia.
Serve with:
- Celery
- Carrots
- Ranch or blue cheese
- Warm Buffalo sauce on the side
Fried wings should be glossy, evenly coated, and still crisp under the sauce — the signature Buffalo wing texture.
Baked Wings: The Apartment‑Friendly Crispy Method
Baked wings are the hero for anyone cooking in an apartment, condo, dorm, or anywhere you don’t have access to a grill or deep fryer. Done right, baked wings get shockingly close to fried wings — crisp skin, juicy meat, golden color — without oil, smoke, or lingering fryer smell. The key is pre-drying, airflow, high heat, and saucing at the right moment.
Below is the full baked‑wing method, including prep, rack setup, oven strategy, crisping, and saucing. The same methods work for use with an air fryer, just adjust your times down.
Step 1: Prep the Wings (Whole or Party Wings)
For baked wings, you can use whole wings or separated wings — both work well. Whole wings have a slight moisture advantage and require less flipping, while party wings give you the classic drums‑and‑flats Buffalo experience.
Regardless of style:
- Pat wings very dry — baked wings don’t have bubbling oil to remove moisture.
- Season lightly with salt and pepper.
- Optional: Refrigerate uncovered for 1–12 hours to dry the skin even more.
Dry skin is the foundation of crisp oven wings.
Step 2: Set Up Your Baking Sheet
Airflow is everything.
- Line a baking sheet with foil for easy cleanup.
- Place a wire rack on top — this lifts the wings and lets air circulate underneath.
- Space wings out so they’re not touching.
Crowding traps steam and ruins crispness.
Step 3: The High‑Heat Bake (425°F)
Baked wings need high heat to mimic the crisping power of a fryer.
Set your oven to 425°F (or 400°F if your oven runs hot). If you have convection, turn it on — the circulating air acts like a mini air fryer.
Place wings on the rack and bake for 35–45 minutes, flipping halfway through.
During the bake:
- The skin will tighten and begin to blister.
- Fat will render from under the skin.
- The wings will turn golden and crisp.
If you want extra color, finish with a 2–4 minute broil, watching closely so they don’t burn.
Step 4: Check for Doneness
Baked wings should reach 185–190°F internal — higher than chicken breast, but perfect for wings. This ensures:
- Fully rendered skin
- Juicy meat
- No rubbery texture
If the wings look pale, give them a few extra minutes. Oven wings need patience.
Step 5: Saucing Baked Wings (Timing Matters)
Saucing baked wings is different from saucing fried wings. Oven wings have crisp skin but no oil barrier, so timing is crucial.
The Oven‑Wing Saucing Method
1. Sauce Warm, Wings Hot Warm your Buffalo sauce (hot sauce + butter). Warm sauce grips crisp skin; cold sauce ruins it.
2. Toss Immediately After Baking As soon as wings come out of the oven, toss them in warm sauce. The residual heat helps the sauce absorb into the blistered skin.
3. Optional: Return to the Oven for 2–3 Minutes If you want a slightly set, sticky finish, place sauced wings back on the rack for a couple minutes. This lightly caramelizes the sauce without drying the wings.
4. Final Drizzle (Optional) For saucy wings, add a second drizzle right before serving.
Step 6: Serving Baked Wings
Baked wings should be:
- Golden
- Crisp
- Lightly blistered
- Glossy with warm sauce
Serve with celery, carrots, ranch or blue cheese, and a little extra Buffalo sauce on the side.
Baked wings are clean, reliable, and surprisingly close to fried wings — especially when you master drying, airflow, and saucing.
“The price of greatness is responsibility.”
— Winston Churchill
And the moment you’ve been waiting for…
The People’s Choice – Championship Wingsauce Secret Recipe
There are wing sauces… and then there is this.
The People’s Choice wingsauce is a moment. It’s our opportunity to serve and give back to friends and family. It’s the kind of sauce experience that when you take a bite, you forget your surroundings, and get whacked across the head by your spouse because you’ve slipped into a full‑blown wing trance, and still keep eating. It’s the kind of sauce that when you take a bite, you get groin-punched by your buddy because you just ate the last wing he was reaching for — and you still keep eating. It’s the kind of sauce that when you take a bite, and suddenly your kid is climbing up your leg screaming for something you didn’t hear — and you still keep eating.
It’s the kind of sauce that gets whispered about at cookouts.
It’s the kind of sauce that wins Championship Belts because people take one bite and immediately point at their food like, “This. This right there.”
This sauce is built the way great sauces are built: layer by layer, flavor by flavor, each ingredient doing its part in a slow‑burn symphony. Butter for richness. Onion for sweetness. Johnson Rub for swagger. Molasses and balsamic for depth. Ranch for that unmistakable tang. And finally — only when the heat is off — a tidal wave of Frank’s RedHot to bring the whole thing home. This is The People’s Choice champion wingsauce, and now we’re entrusting our secret with you.
The People’s Choice Champion Wingsauce Recipe:
Serves Makes ~2 cups
Ingredients
2 tbsp – Olive oil
1 stick – Butter
1 – Sweet onion, chopped
1 tbsp – Johnson Rub
2 tbsp – Dijon mustard
1/4 cup – Ketchup
2 tbsp – Molasses
2 tbsp – Balsamic vinegar
2 cloves – Garlic, smashed and peeled
1 tbsp – Worcestershire sauce
1 tbsp – Fish sauce
1 packet – Hidden Valley Ranch seasoning
12 oz – Frank’s RedHot Original
Instructions
Build the base:
Coat the bottom of a 2‑quart pot with olive oil. Melt 1 stick of butter over medium heat.
Sauté the aromatics:
Add the chopped sweet onion and Johnson Rub. Let it sauté until the onion softens and becomes fragrant.
Layer the flavor:
Stir in Dijon mustard, ketchup, molasses, balsamic vinegar, smashed garlic cloves, Worcestershire sauce, fish sauce, and the ranch seasoning packet. Mix thoroughly.
Let the mixture come to a gentle boil to marry the flavors.
The Finish:
Turn off the heat to avoid filling your house with overpowering pepper fumes. Add the 12 oz of Frank’s RedHot and stir until fully combined. Pour through a strainer to remove the spent onion/garlic and Serve The People.
Closing
And there it is. All the secrets. All the tricks. All the championship‑level sorcery we probably should’ve kept locked in a fireproof safe behind a biometric scanner in a trapdoor at the bottom of the barn guarded by uber aggressive Sicilian wild boars. But no — we handed it to you. Freely. Boldly. Recklessly.
So now it’s your turn to Serve the People.
Go make wings that stop conversations. Wings that cause traffic accidents. Wings that make neighbors wander into your yard “just to see what’s going on.” Wings that get talked about long after the grill cools down.
Because once you’ve got The People’s Choice sauce in your hands, you’re not just making wings anymore — you’re entering the arena.
Welcome to the SlowPaddle wing movement. Try not to start any fights.