Home » Step-by-Step Guide to Smoking a Delicious Beef Brisket on Your Smoker or Grill
Step-by-Step Guide to Smoking a Delicious Beef Brisket on Your Smoker or Grill
Smoked Beef Brisket
Table of Contents
Are you ready to take your BBQ skills to the next level with a perfectly smoked beef brisket? Crusty bark outside, melt-in-your-mouth juicy inside, and packed with smokey-beefy flavor? This is a game-changer. This cut of meat may be tough, but with the right recipe and cooking method, you can transform it into a tender and flavorful masterpiece that will earn you next-level BBQ respect. Follow our step-by-step guide to smoking a mouth-watering beef brisket in a smoker or grill, and impress your friends and family at your next BBQ gathering.
Keys to Success for a Champion Level Smoked Beef Brisket
High-quality meat: Using a high-quality beef brisket will improve results. Better grades of beef have a good amount of marbling, which will help to keep the meat moist and flavorful during the smoking process.
Proper trimming: Trimming the brisket correctly will help to ensure that it cooks evenly and is tender when finished. Trim off any excess fat and remove the silver skin from the underside of the brisket before smoking.
Low and slow cooking: Smoking a brisket at a low temperature for a long time will help to break down the connective tissue and create a tender, flavorful result. Aim for a temperature of around 250°F and plan on smoking the brisket for about 1 hour per pound. Avoid large temperature swings that stress the meat and cause toughness.
Proper slicing: Slicing the brisket correctly will help to ensure that each slice is tender and flavorful. Be sure to slice against the grain at a slight angle to help break down the fibers and make for easier chewing.
Rest your meat: While resting steaks and pork shops is good advice, and 10-15 minutes makes a big difference, with beef brisket we’re talking a different game. Brisket is 5 to 10 times the mass of a steak. You’ll want to rest a beef brisket 1 to 2 hours before serving.
The Anatomy of the Beef Brisket
Before we dive into the recipe, let’s talk about what exactly a brisket is. By understanding the anatomy of a beef brisket, you can better choose the best method of cooking and slicing the meat for your desired outcome. A brisket is a cut of beef from the breast or lower chest of a cow. It can be a tough cut of meat because it’s used a lot by the cow, so it requires a longer cooking time to break down the collagen and fat—this means low & slow. But when it’s cooked correctly, it a big “O” for your mouth!
A beef brisket consists of two main muscles: the “point” and the “flat.”
The point: The point is the fattier, thicker end of the brisket. This is the part you want to make burnt ends from. It is made up of a group of muscles that are well-used and have a lot of connective tissue, which makes it tougher. It may be fattier and tougher, but it’s also more flavorful. We commonly see the point sold as corned beef around St Patty’s Day.
The flat: The flat is the leaner, thinner end of the brisket, and it is typically used for slicing. It is made up of a single muscle that is less well-used and has less connective tissue, which makes it more tender.
The brisket has a fat cap on top, which is a layer of fat that helps to keep the meat moist and flavorful during the cooking process. It also has a layer of connective tissue called the “silver skin” on the underside, which should be trimmed off before cooking.
When shopping for a beef brisket to smoke, here are some things to consider:
Size: Look for a brisket that is around 10-15 pounds. This size is ideal for smoking, as it will take a reasonable amount of time to cook and will yield enough servings for the group. A 10-15 pound beef brisket will typically serve around 10-15 people. This serving size assumes that the brisket is served as part of a larger meal, with BBQ style sides.
Over 15 pounds will take a looonnnggg time to cook! My experience has been that two 10 pound briskets will give you much better results than trying to cook one monster 18-20 pounder. The 1 hr cook per pound rule is a pretty good guide, and a lot can go wrong in 20 hours.
Keep in mind that the actual number of servings will depend on a variety of factors, such as the appetite of your guests and the size of the slices you cut. If you’re unsure how much brisket to purchase, it’s always better to err on the side of caution and get a bit more than you think you’ll need. Leftover brisket makes for delicious sandwiches or tacos the next day!
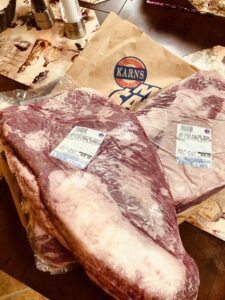
Grade: Beef brisket can be graded as either “prime,” “choice,” or “select.” These grades are based on the amount of marbling (small flecks of fat within the muscle) and the overall quality of the cut, and directly impact the price.
Prime grade brisket: This is the highest grade of brisket, and it has the most marbling of the three grades. It is typically sold to restaurants and high-end markets, and it is the most expensive of the three grades. Occasionally I’ve seen prime grade brisket in Sam’s Club.
Choice grade brisket: This is the next highest grade of brisket, and it has a moderate amount of marbling. It is a good choice for smoking, as it has enough fat to keep the meat moist and flavorful during the cooking process. Better grocery store chains will usually carry choice.
Select grade brisket: This is the lowest grade of brisket, and it has the least amount of marbling. It is leaner than the other two grades and may be less flavorful and tender when cooked. This is what you will see in the discount grocery stores and is the least expensive of the three grades. That said, following our techniques, you can save a few bucks with select and still make an incredible meal.
You may also see Angus or Wagyu beef. While not a “grade”, these are considered higher quality beef with price points similar to Prime or even higher.
When shopping for a brisket to smoke, I generally recommend “choice” grade, as they have a nice balance of quality vs cost. Choice will have a good amount of marbling and will be flavorful and tender when cooked, but without the expense of Prime, Angus, or Wagyu.
Fat content: Look for a brisket that has a good amount of fat on the top, known as the “fat cap.” This fat will help to keep the meat moist and flavorful during the smoking process.
Shape: Look for a brisket that is evenly shaped and not too elongated or thin. The flat should be at least an inch thick. An evenly shaped brisket will cook more evenly and be easier to slice.
Freshness: Make sure to purchase your brisket from a reputable source and check the sell-by date to ensure that it is fresh.
Price: Brisket can be a bit pricey, so be prepared to spend a bit more for a good quality cut. However, keep in mind that it’s a huge piece of meat that will satisfy a large group and the end result will be worth it!
How to Trim a Brisket
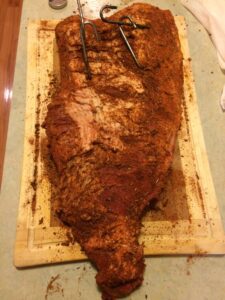
Trimmed Beef BrisketRemove any excess fat from the cap: Using a sharp knife, carefully trim off any excess fat from the brisket. Aim to leave about a ¼” layer of fat on top of the brisket, known as the “fat cap,” as this will help to keep the meat moist and flavorful during the smoking process.
Remove the silver skin: On the underside of the brisket, there is a thin layer of connective tissue called the “silver skin.” Using a sharp knife or kitchen shears, carefully cut this layer off. Be sure to cut as close to the meat as possible, as the silver skin does not break down during the smoking process and will become tough if left on.
Trim off any uneven or excess fat: Carefully inspect the brisket and trim off any uneven or excess fat that may be present. Uneven pieces dangling from the main body of the brisket will turn to charcoal during the long cooking process. Remove them.
Trim the excess fat from the point: The “point” is the fattier end of the brisket, and it is typically used to make burnt ends. If you plan on making burnt ends, you may want to leave a bit more fat on the point. If not, you can trim off any excess fat to help the point cook evenly with the rest of the brisket.
Trim off oxidized areas: It’s very common to have a side that looks dried out or rough. This is oxidation, and should be removed. Oxidized meat will have poor quality flavor and texture, and if not removed, will detract from your masterpiece.
There are many types of wood that can be used to smoke beef brisket, and the best one for you will depend on your personal taste and the flavor profile you want to achieve. Some of the most popular woods for smoking beef brisket include:
Oak: This is a popular choice for smoking beef brisket due to its strong, bold flavor. It imparts a slightly sweet, smoky taste that pairs well with the rich flavor of beef.
Hickory is a popular choice for smoking beef brisket due to its strong, smoky flavor. It imparts a bold, slightly sweet flavor to the meat that pairs well with the rich flavor of beef. Hickory can be overpowering if used in large quantities, so it is best used in moderation.
Mesquite: This wood has a strong, smoky flavor that can be overpowering if used in large quantities. It is best used in small amounts to add depth and complexity to the flavor of beef brisket. If you’re doing Texas style brisket, mesquite is a must.
Pecan: This wood has a mild, sweet flavor that is similar to hickory, but slightly nuttier. It works well with beef, pork, and poultry.
Cherry: This wood has a sweet, fruity flavor that works well with beef, pork, and poultry. It is a good choice for those who want a mild, sweet smoke flavor.
Apple: This wood has a mild, fruity flavor that pairs well with beef. It is a good choice for those who want a subtle smoke flavor.
Peach: This wood has a mild, sweet flavor that pairs well with beef, pork, and poultry. It is a good choice for those who want a subtle smoke flavor.
Maple: This wood has a mild, sweet flavor that pairs well with beef, pork, and poultry. It is a good choice for those who want a subtle smoke flavor.
Alder: This wood has a mild, slightly sweet flavor that pairs well with fish, poultry, and pork. It is a good choice for those who want a subtle smoke flavor.
Walnut: This wood has a strong, smoky flavor that can be overpowering if used in large quantities. It is best used in small amounts to add depth and complexity to the flavor of beef brisket.
Grapevine: This wood has a mild, slightly sweet flavor that pairs well with beef, pork, and poultry. It is a good choice for those who want a subtle smoke flavor.
For long low-n-slow cooks, I prefer wood chunks over chips. Most often I will combine hickory and cherry, and I find myself using pecan more and more as well. If I have it on hand, I’ll may add a small amount of oak or maple. Ultimately, the best wood for smoking beef brisket is a matter of personal preference. Experiment with different types of wood to find the one that works best for your taste buds.
Your favorite BBQ rub (recipes to make your own below)
BBQ sauce (recipes to make your own below)
Charcoal or pellets
Wood chunks or chips (I’ve had best results with a mix of hickory and cherry)
A smoker or a grill with a smoker box
Meat thermometer
Step 1: Prep the brisket
The night before the cook you want to trim the brisket, following the directions above. After trimming, rinse off the brisket under cold water. Dry brine the brisket by sprinkling salt on the wet beef. Dry brining the night before will allow the salt to be absorbed deep into the beef, which enhances both flavor and the ability of the meat to retain moisture for the juiciest possible final result. This makes a HUGE difference!!!
Wrap in foil, plastic wrap or a jumbo sized ziplock back or turkey roaster bag, and place back in the refrigerator overnight.
Generously rub the beef brisket
Step 2: Apply the rub
Take your brisket out of the fridge and let it come to room temperature for about an hour before you plan to start the cook. This will help it cook more evenly.
Generously coat the brisket with your favorite BBQ rub, making sure to get it on all sides. You can use store-bought rubs or make your own with a combination of spices like paprika, garlic powder, and chili powder—see the recipes below. Black pepper is a must-have for brisket! You can make a really good brisket using just a salt and pepper rub, but a rub without pepper is going to be disappointing.
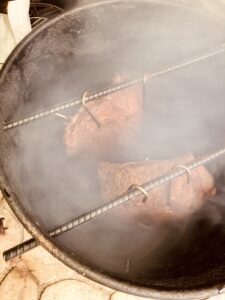
Step 3: Smoke the brisket
Now it’s time to fire up the smoker or grill. If you’re using a smoker, preheat it to between 225°F and 275°F. Add your wood chunks or chips to the smoker box. If you’re using a grill, set it up for indirect heat and place the wood chips in a foil pouch directly on the coals.
Place the brisket in the smoker or on the grill and smoke it for about 1 hour per pound. You’ll want to maintain a temperature of around 250°F (+/- 25°F) throughout the cooking process. The more consistent you can hold the temperature, the less stress there is on the beef and the better results will be.
Step 4: The Texas Crutch – Wrap the Brisket
After the brisket has been smoking for about 5-6 hours, the meat has pretty much maxed out the amount of smoke it will absorb and a pretty good bark has formed. It’s time to apply a method called the Texas Crutch. This technique helps the brisket cook more evenly, retain more moisture, and speed up the overall cooking time by 2-3 hours.
Pull the Brisket off the smoker
Pull the brisket off the smoker and place it in a wrap – using two layers of foil or pink butcher’s paper. Add 2 cups of juice and wrap it tightly, being sure to completely enclose the meat. For juice you can use wine, beer, beef broth, or even something like 7-UP.
For juice, I use either beer or beef broth with some Worcestershire sauce, garlic, some of the rub. For wrap, I prefer using foil as I think it gives better results, but there is a large fan base for using pink butcher’s paper. If using foil, you can wrap the beef loosely, then squeeze the foil tight against the meat. The object is to keep the moisture in to braise the meat, but not have any air pockets that would allow boiling as this would destroy your bark.
Next, return the wrapped brisket to the smoker. If you prefer, you can switch to using your kitchen oven at this point, as the fire and smoke has already accomplished its mission. Just be sure to preheat the oven to the same temperature as you were using on the grill or smoker.
Note: The cooking time will vary depending on the size and thickness of the brisket, as well as the temperature of the smoker. It’s essential to use an accurate meat thermometer to ensure that the brisket is cooked to the proper internal temperature.
Step 5: Finish the brisket
Continue cooking the wrapped brisket until it reaches an internal temperature of at least 203°F. At this point, the brisket should be tender and easily pull apart with a fork.
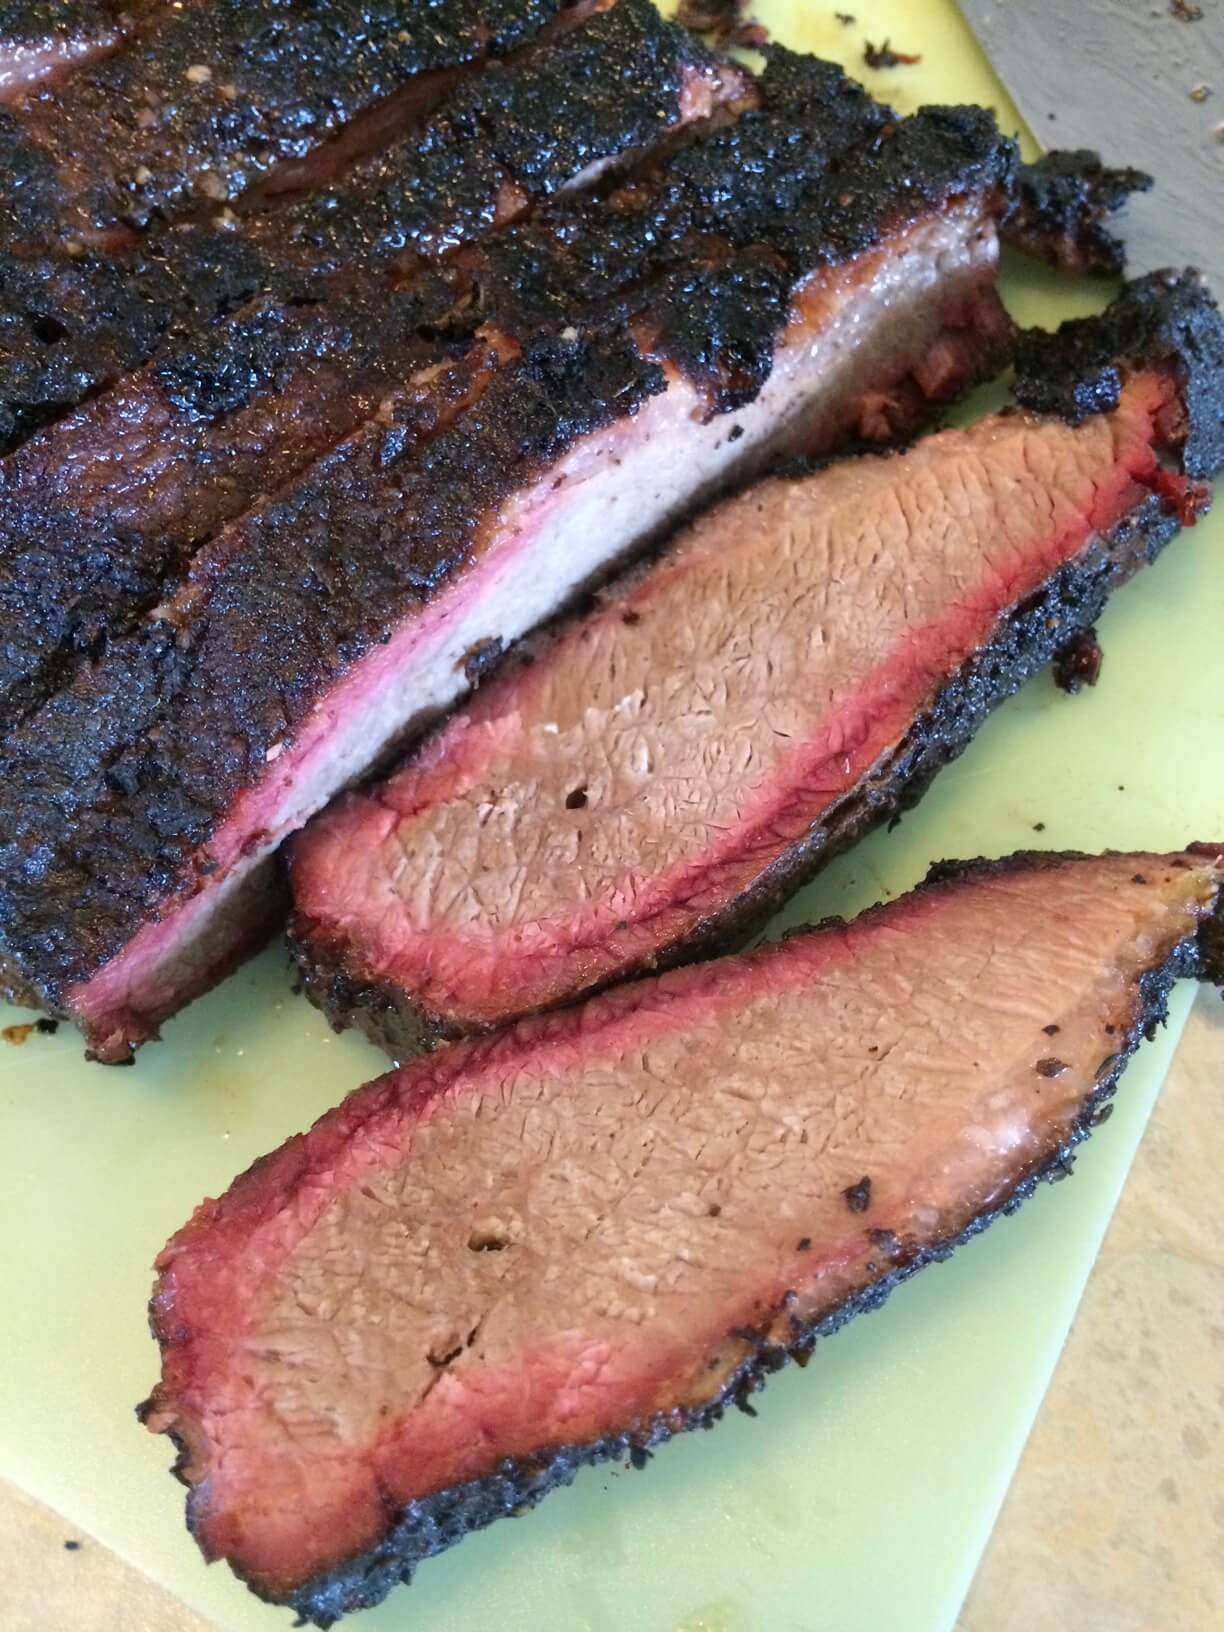
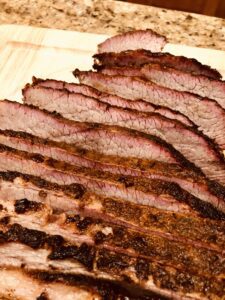
Smoke ring on the sliced beef brisket
Step 6: Slice and serve
Remove the brisket from the smoker or grill and let it rest for 1-2 hours. This will allow the juices to redistribute and make for a juicier and more tender brisket. After resting, unwrap the brisket and move it to a cutting board—preferably one that has a juice well. Pour the remaining juice into a cup or bowl and set aside for now.
As we discussed, a brisket has two parts: the flat and the point. Taking a large chef knife or carving knife and cut through the soft fatty layer to separate the two—your knife should slice through the fat like soft butter. Remove any excess fat by cutting and scraping it off with the knife.
Now that we have the flat and point separated and the excess fat cleaned off, identify which direction the grain of the meat is going. We want to cut across the grain at a slight angle and keep the slices as even as possible. This will help to break down the fibers, help retain juiciness, and make for easier chewing.
When you’re done slicing, you should have a pile of lean sliced flat, fattier more flavorful sliced point, and a pile for everybody’s favorite: burnt ends. Pour the juice you have set aside back over the sliced brisket and you’re ready to serve! Serve the sliced brisket with your favorite BBQ sauce on the side, but we’ve found the brisket is so good that most people skip the sauce.
By following these steps, you should have perfectly sliced smoked beef brisket that is ready to be enjoyed. And there you have it! A delicious smoked beef brisket that is sure to impress your friends and family. Just be prepared to share the recipe because they’ll definitely be asking for it.
DISCLOSURE: Slowpaddle is a member of several affiliate programs including Amazon, Pit Barrel Cooker, Camp Chef, and MoreFlavor!. By using the links provided in our blogs, articles, pages, videos, and social posts, you are supporting our work! When you make a purchase using our links, we may receive compensation from the retailer, and at no additional cost to you. We thank you for your support.
An interesting discussion is definitely worth comment. I do believe that you should publish more about this subject, it may not be a taboo matter but typically people dont discuss these subjects. To the next! Many thanks!!


 Step 3: Smoke the brisket
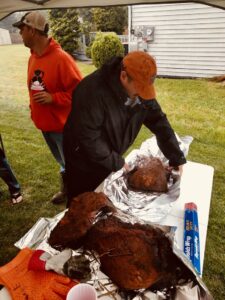 Step 4: The Texas Crutch – Wrap the Brisket
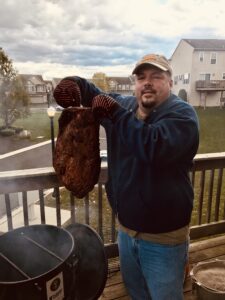


One Response
An interesting discussion is definitely worth comment. I do believe that you should publish more about this subject, it may not be a taboo matter but typically people dont discuss these subjects. To the next! Many thanks!!